
Md.Habibur Rahman
June 22, 2020
GitHub For Babies- Part 3
In this part, we will be exploring branching. In the previous lesson, we learned how to upload our work to GitHub, but what if we are in a team where each member is in a different place in a different machine and where we have to edit the same project lots of time. In order to maintain a good collaboration among the team members and dividing their work individually to complete, branching comes in handy.
In Git, a branch is just a pointer to a particular commit. When we create a repository anything we do save in a branch named Master by default. The concept of branching is very useful because you can create multiple branches and assign your teammates to work individually. This won’t affect anyone’s code and more importantly, you don’t have to suffer from other teammate’s mistakes. The Master branch is commonly considered as the main final version of your project. When your teammates finish their work individually in a separate branch then you can merge the branches to make the final complete flawless version of your project. Or you can discard the changes if they do not work out.
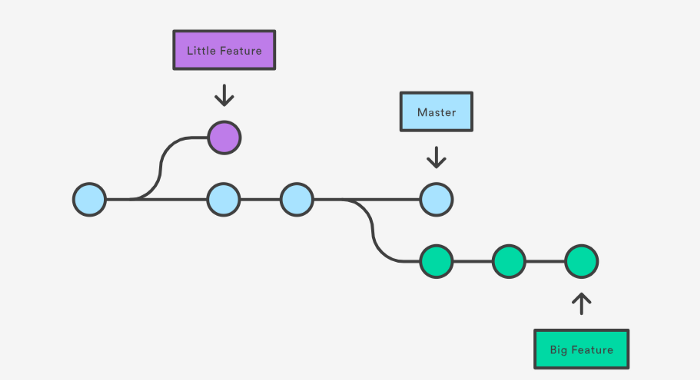
For example, think of an assignment your teacher gave you. To complete the assignment you used different notebooks topic-wise to jot down rough drafts but kept one main notebook in a tidy state where you copy polish versions into it. Here, your main notebook is your Master branch and the notebooks you used for doodling are your feature branches.Note: When you create a new branch, all of your master branch work will be copied there. You can add and remove now according to your needs.
Hands-on
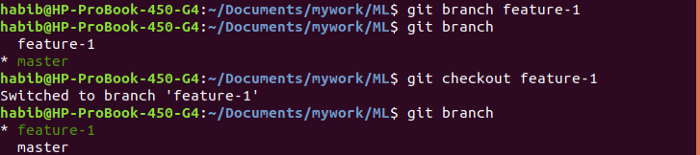
First, you need to know about the branches in the repository currently you are working on, perform the following command:
git branch
as you did not create any branch previously you will notice a green marked word Master with a star in front of it which indicates you are currently on the Master branch.

now, to create a new branch named feature-1 perform
git branch feature-1
after that, to view the available branches type -
git branch
then you will see all the available branches.now to switch between the branches type-
git checkout feature-1
now if you type -
git branch
then you will see the all the available branches and you will also see that you are in feature-1 branch [with the star(*) shows that]
let’s create a new file named feature_branch.txt under this branch. Now, if you see the files with ls command in the directory, you will notice all the files under this branch but if you switch now to the master branch (with the command above) then you won’t have the newly created files under the feature-1 branch. You will only have those files that you created under the master branch. It will dynamically change with the twinkling of an eye. This is how tremendously Git gives you a separate environment to work. To observe this, open the terminal while you are in the directory and perform the branch switching commands. Outputs are given below:
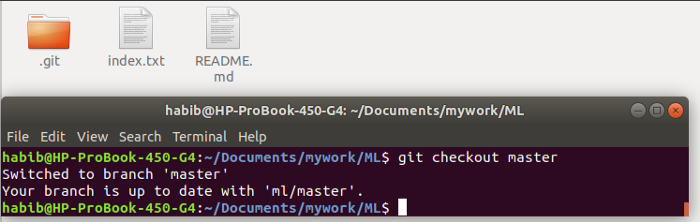 while you are in master branch(above)
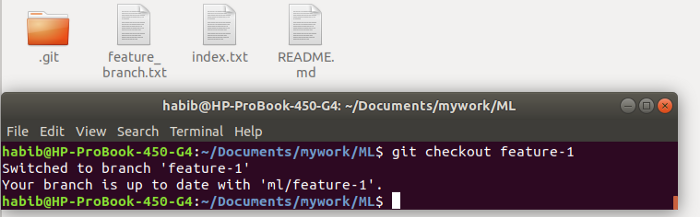 while you are in feature-1 branch(above)
Similarly, we will create two more branches naming feature-2 and feature-3.As we created the branches locally, the remote repository does not have any idea about the changes we’ve made. So, we need to update this. So we will push these changes to the remote repo-
git push ml feature-2
Here, ml is the remote name, by default it has the name origin when we create or clone a repo(but you can change the name like me), and feature-2 is the branch name. Now, if we refresh or open our online GitHub repo we will see that we have new branches.Additional Note:
You can also create and switch to the newly created branch by this command-
git checkout -b feature-1
what if you want to delete a branch? Go with this-
git branch -d feature-1
(feature-1 is the branch name in all the above cases)
P.S - Cover Image credit goes to Unsplash
comments powered by Disqus